Nginx
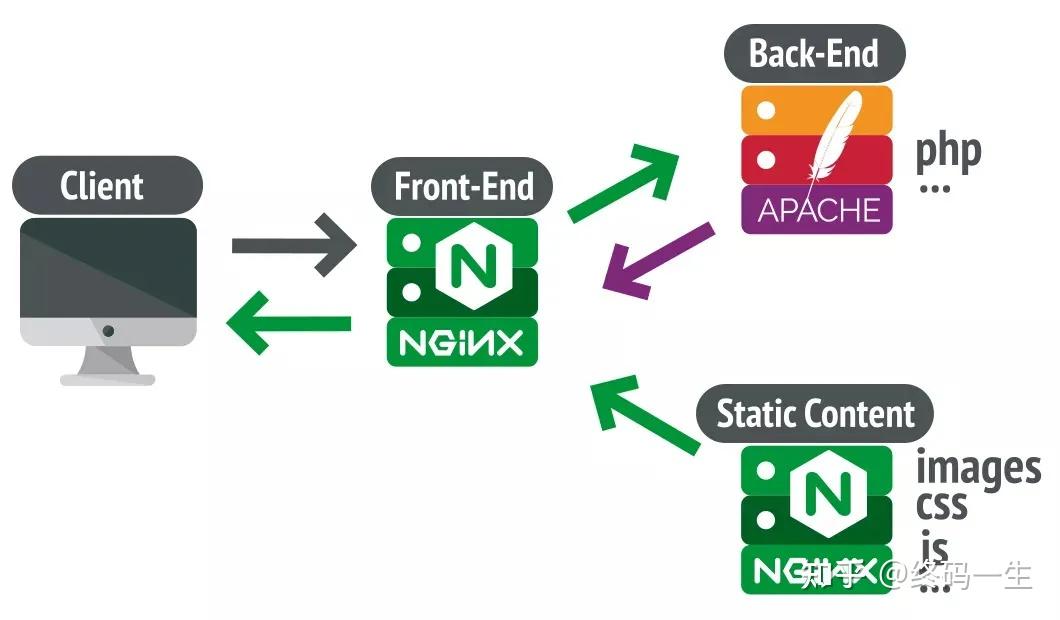
Nginx架构图
# 下载 Nginx 镜像
docker pull nginx:1.27

# 运行 Nginx 容器 :
	-p 80:80: 将宿主机的 80 端口映射到容器的 80 端口上,
	-d: 以后台方式运行镜像;
	--name: 指定容器的名称为 nginx;
docker run -d -p 80:80 --name nginx nginx:1.27

# 创建 Nginx 挂载目录
mkdir -p /docker/nginx

# 复制 Nginx 配置文件至宿主机
	# 复制名称为 nginx 容器中 /etc/nginx/nginx.conf 文件夹到宿主机的 /docker/nginx 路径下
docker cp nginx:/etc/nginx/nginx.conf /docker/nginx
	# 复制名称为 nginx 容器中 /etc/nginx/conf.d 文件到宿主机的 /docker/nginx 路径下
docker cp nginx:/etc/nginx/conf.d /docker/nginx

# 修改 Nginx 配置文件,添加反向代理
cd /docker/nginx/conf.d
vim default.conf

proxy_set_header Host $host;
proxy_set_header X-Real-IP $remote_addr;
proxy_set_header X-Forwarded-For $proxy_add_x_forwarded_for;
# 反向代理到后台 Web 服务
proxy_pass http://172.17.0.1:8080;

# 强制删除Nginx容器
docker rm -f nginx

# 运行一个新的 Nginx 容器:
	-p 80:80:将容器的 80 端口映射到主机的 80 端口;
	-v /docker/nginx/nginx.conf:/etc/nginx/nginx.conf:将容器中的 /etc/nginx/nginx.conf 文件挂载到宿主机中的 /docker/nginx/nginx.conf 文件上;
	-v /docker/nginx/conf.d:/etc/nginx/conf.d:将容器中 /etc/nginx/conf.d 目录挂载到宿主机中的 /docker/nginx/conf.d 目录上;
	-v /docker/nginx/logs:/var/log/nginx:将容器中的 /var/log/nginx 目录挂载到宿主机中的 /docker/nginx/logs 目录下, 用以查看 Nginx 日志.
docker run -d -p 80:80 --name nginx -v /docker/nginx/nginx.conf:/etc/nginx/nginx.conf -v /docker/nginx/conf.d:/etc/nginx/conf.d -v /docker/nginx/logs:/var/log/nginx nginx:1.27

#上传前端打包文件前先创建文件夹,然后把文件上传到此文件夹
mkdir -p /docker/nginx/html

# 配置 Nginx:
	location / 部分:
	try_files $uri $uri/ @router; 尝试查找请求的文件,如果找到则直接返回,否则将请求交给 @router 命名的位置处理。
	root /usr/share/nginx/html; 指定静态文件的根目录,这是一个默认的 Nginx 静态文件目录。
	index index.html index.htm; 指定首页文件。
	location @router 部分:
	rewrite ^.*$ /index.html last; 将所有请求重写到 index.html,这是为了确保前端路由能够正常工作。前端路由通常使用 		HTML5 History 模式,这样做可以确保前端路由的 SPA 在浏览器端能够正确处理。
	location /api 部分:
	rewrite ^/api/(.*)$ /$1 break; 将以 /api 开头的请求的 URI 重写为不包含 /api 的形式,因为后端的接口均不是以 /api 开头。
	proxy_set_header 指令用于设置传递给后端的一些头信息。
	proxy_pass http://172.17.0.1:8080; 将请求代理到后端 Web 服务,地址为 http://172.17.0.1:8080。
vim /docker/nginx/conf.d/default.conf
server {
    listen       80;
    listen  [::]:80;
    server_name  localhost;

    #charset koi8-r;
    #access_log  /var/log/nginx/host.access.log  main;

    location / {
        try_files $uri $uri/ @router;
        root   /usr/share/nginx/html;
        index  index.html index.htm;
    }

    location @router {
        rewrite ^.*$ /index.html last;
    }

    location /api {
        rewrite  ^/api/(.*)$ /$1 break;
        proxy_set_header Host $host;
        proxy_set_header X-Real-IP $remote_addr;
        proxy_set_header X-Forwarded-For $proxy_add_x_forwarded_for;
        # 反向代理到后台 Web 服务
        proxy_pass http://172.17.0.1:8080;
    }

    #error_page  404              /404.html;

    # redirect server error pages to the static page /50x.html
    #
    error_page   500 502 503 504  /50x.html;
    location = /50x.html {
        root   /usr/share/nginx/html;
    }

    # proxy the PHP scripts to Apache listening on 127.0.0.1:80
    #
    #location ~ \.php$ {
    #    proxy_pass   http://127.0.0.1;
    #}

    # pass the PHP scripts to FastCGI server listening on 127.0.0.1:9000
    #
    #location ~ \.php$ {
    #    root           html;
    #    fastcgi_pass   127.0.0.1:9000;
    #    fastcgi_index  index.php;
    #    fastcgi_param  SCRIPT_FILENAME  /scripts$fastcgi_script_name;
    #    include        fastcgi_params;
    #}

    # deny access to .htaccess files, if Apache's document root
    # concurs with nginx's one
    #
    #location ~ /\.ht {
    #    deny  all;
    #}
}

# 重新运行容器,并挂载前端文件,需要先将正在运行的 Nginx 容器删除掉
docker rm -f nginx
# 重新运行容器,并把前端工程所在的目录,挂载到容器中的 /usr/share/nginx/html 文件夹上
docker run -d -p 80:80 --name nginx -v /docker/nginx/nginx.conf:/etc/nginx/nginx.conf -v /docker/nginx/conf.d:/etc/nginx/conf.d -v /docker/nginx/logs:/var/log/nginx -v /docker/nginx/html:/usr/share/nginx/html nginx:1.27

# /docker/nginx 目录下,创建一个 cert 目录
mkdir -p /docker/nginx/cert

# 进入/docker/nginx/conf.d 目录下,创建一个 quanxiaoha_ssl.conf
	注意点1:这里配置的 SSL 证书路径在 /etc/nginx/cert/ 目录下,等会正式启动容器时,需要将这个目录挂载到宿主机的 			/docker/nginx/cert 目录,否则 Ngnix 启动时会找不到文件。

	注意点2:将原本在 default.conf 的反向代理配置统一移动到了 quanxiaoha_ssl.conf 的配置文件中,方便后续以网站为维度来做	管理。当你准备上线一个新网站时,只需再另外新建一个 conf 配置文件即可。
server {
    listen 80;
    listen  [::]:80;
    server_name quanxiaoha.com www.quanxiaoha.com;
    # 将所有 http 请求 301 重定向到 https 请求,
    return 301 https://www.quanxiaoha.com$request_uri;
}

server {
    # 监听 443 https 端口 , 启用 HTTP/2 协议。HTTP/2 是 HTTP 协议的下一版本,它引入了一些性能优化,例如多路复用(Multiplexing)和头部压缩,以提高页面加载速度。
    listen 443 ssl http2;
    # 域名,修改成你自己的
    server_name quanxiaoha.com www.quanxiaoha.com;

    client_max_body_size 100M;
    # Nginx 容器中的 ssl 证书存放路径(后续会挂载到宿主机的 /docker/nginx/cert/ 目录下)
    ssl_certificate /etc/nginx/cert/8055644_www.quanxiaoha.com.pem;
    ssl_certificate_key  /etc/nginx/cert/8055644_www.quanxiaoha.com.key;
    ssl_session_timeout 5m;
    ssl_ciphers ECDHE-RSA-AES128-GCM-SHA256:ECDHE:ECDH:AES:HIGH:!NULL:!aNULL:!MD5:!ADH:!RC4;
    ssl_protocols TLSv1 TLSv1.1 TLSv1.2;
    ssl_prefer_server_ciphers on;

    location / {
        try_files $uri $uri/ @router;
        root   /usr/share/nginx/html;
        index  index.html index.htm;
    }

    location @router {
        rewrite ^.*$ /index.html last;
    }

    location /api {
        rewrite  ^/api/(.*)$ /$1 break;
        proxy_set_header Host $host;
        proxy_set_header X-Real-IP $remote_addr;
        proxy_set_header X-Forwarded-For $proxy_add_x_forwarded_for;
        # 反向代理到后台 Web 服务
        proxy_pass http://172.17.0.1:8080;
    }

    #error_page  404              /404.html;

    # redirect server error pages to the static page /50x.html
    #
    error_page   500 502 503 504  /50x.html;
    location = /50x.html {
        root   /usr/share/nginx/html;
    }
}

# 编辑 default.conf 的内容
server {
    listen       80;
    listen  [::]:80;

    #charset koi8-r;
    #access_log  /var/log/nginx/host.access.log  main;


    #error_page  404              /404.html;

    # redirect server error pages to the static page /50x.html
    #
    error_page   500 502 503 504  /50x.html;
    location = /50x.html {
        root   /usr/share/nginx/html;
    }

    # proxy the PHP scripts to Apache listening on 127.0.0.1:80
    #
    #location ~ \.php$ {
    #    proxy_pass   http://127.0.0.1;
    #}

    # pass the PHP scripts to FastCGI server listening on 127.0.0.1:9000
    #
    #location ~ \.php$ {
    #    root           html;
    #    fastcgi_pass   127.0.0.1:9000;
    #    fastcgi_index  index.php;
    #    fastcgi_param  SCRIPT_FILENAME  /scripts$fastcgi_script_name;
    #    include        fastcgi_params;
    #}

    # deny access to .htaccess files, if Apache's document root
    # concurs with nginx's one
    #
    #location ~ /\.ht {
    #    deny  all;
    #}
}

# SSL 证书配置完成后,执行如下命令,先将正在运行的 Nginx 容器删除掉
docker rm -f nginx

# 验证配置
nginx -t -c /docker/nginx/nginx.conf

# 重新运行一个 Nginx 容器,将 SSL 文件目录挂载上:
	-p 80:80 -p 443:443:将容器的 80、443 端口映射到主机的 80、443 端口;
	--restart=always: Docker 重启时,容器也跟着重启;
	-v /docker/nginx/nginx.conf:/etc/nginx/nginx.conf:将容器中的 /etc/nginx/nginx.conf 文件挂载到宿主机中的 		/docker/nginx/nginx.conf 文件;
	-v /docker/nginx/conf.d:/etc/nginx/conf.d:将容器中 /etc/nginx/conf.d 目录挂载到宿主机中的 conf.d 目录下;
	-v /docker/nginx/logs:/var/log/nginx:将容器中的 /var/log/nginx 目录挂载到宿主机中的 /docker/nginx/logs 目录下, 	用以查看 Nginx 日志;
	-v /docker/nginx/cert:/etc/nginx/cert : 将容器中的 /etc/nginx/cert 目录挂载到宿主机中 						/docker/nginx/cert:/etc/nginx/cert 目录下,用于容器内部能够正常读取到 SSL 证书;
	-v /docker/nginx/html:/usr/share/nginx/html : 将前端工程所在的目录,挂载到容器中的 /usr/share/nginx/html 文件夹		上;
	还需要将云服务器的 443 端口加入到安全组中,才能保证外界的正常访问 https 端口.
docker run -d -p 80:80 -p 443:443 --name nginx -v /docker/nginx/nginx.conf:/etc/nginx/nginx.conf -v /docker/nginx/conf.d:/etc/nginx/conf.d -v /docker/nginx/logs:/var/log/nginx -v /docker/nginx/cert:/etc/nginx/cert -v /docker/nginx/html:/usr/share/nginx/html nginx:1.27

	将docker 的挂载卷 设置为 -v /root/ssl/letsencrypt:/etc/nginx/cert 然后nginx 的default.conf 中的证书位置为 		/etc/nginx/cert/live/xxxx/fullchain.pem 即可,这样即使取 ../../archive/xxxx/fullchain.pem 也可以取到

# 重启 Nginx 容器,让容器加载刚刚新添加的配置文件
docker restart nginx

# 查看nginx的启动用户
ps aux|grep nginx
ps aux | grep "nginx: worker process" | awk  '{print $1}'

# 在命令行发起请求类似axios请求
curl -I http://47.116.10.106:8080/surfer/tag/list # get
curl -X POST http://47.116.10.106:8080/surfer/tag/list # post

# 开启 Gzip 压缩
 cd /docker/nginx/
 vim nginx.conf
    # 开启 gzip
    gzip  on;
    # 启用 gzip 压缩的最小文件,小于设置值的文件则不会被压缩
    gzip_min_length 1k;
    # 设置压缩所需要的缓冲区大小
    gzip_buffers 32 4k;
    # 设置 gzip 压缩针对的 HTTP 协议版本
    gzip_http_version 1.1;
    # gzip 压缩级别,1-9,数字越大压缩的越好,也越占用CPU时间
    gzip_comp_level 6;
    # 进行压缩的文件类型,javascript 有多种形式。
    gzip_types       text/plain application/x-javascript text/css application/xml text/javascript application/x-httpd-php application/javascript application/json;
    # IE 6 以下浏览器不启用 gzip (因为 IE 6 以下不支持)
    gzip_disable "MSIE [1-6]\.";
    # 是否在 http header 中添加 Vary: Accept-Encoding,建议开启
    gzip_vary on;